Bathroom Cupboard Routing Project
With panel doors designed to fit within an alcove of a newly refurbished bathroom, living room, bedroom or a kitchen.

This cupboard is designed to fit within an alcove of a newly refurbished bathroom. It has a dual function in that it has to hide some ugly pipe work, which is easily achieved by setting the back of the cupboard well forward. It would fit equally well as a piece of living room or bedroom furniture, or with the modern trend towards separate free standing units, even in a kitchen.
Step 1 - Select and Prepare Timber
Oak in various forms is readily available at most timber merchants, my preference for both working qualities and cost being the European variety. Although it may seem dearer, buying square edged material is actually far less wasteful than waney edged stock and allows you to calculate more accurately just how much you need. Nevertheless you will still need to allow at least 30% for waste, so build in a big margin for this, particularly if you are working to a budget. There is always much more waste than you thought and unfortunately boards are seldom perfect so you will need to examine each one very carefully before you start cutting.

Choose the boards carefully, looking at the endgrain to try and find those as near quarter sawn as possible to ensure stability when you are making up wide sections. Modern sawmilling economics usually means that there is very little true quarter sawn material around these days, but some of it is not far off if you look carefully enough.

Although the ends of the boards may look sound, Oak in particular may have internal cracks quite a long way back from the end, so take off several slices until you reach sound material. With one good end you can now cross cut all the pieces to make up the carcass, cutting the longest lengths first and the shorter pieces from what remains. Leave them all slightly over length at this stage.

The boards will inevitably be warped and twisted to some extent, so surface them carefully, maintaining pressure on the outfeed end of the planer table to get them straightened out. The edges need to be treated with equal care to get them square to the face, or you will have all sorts of problems later when you are trying to glue up the wider widths.
Step 2 - Jointing the Material
With one good face and edge, the boards can then all be thicknessed to the required dimension, finishing off with a really fine cut that should leave a super smooth finish that requires very little in the way of cleaning up. Lay the finished boards out on the bench and arrange them so the grain, in successive boards, matches up as closely as possible.

With the arrangement finalized, check each joint line to make sure there are no gaps. If there are, go back and re-plane each edge. Do not attempt to pull the joint together with sash cramps as the stress this will induce inevitably results in the board cracking at a later stage. If you are having trouble machine planing the edges perfectly square, try reversing the face side of alternative boards against the planer fence to cancel out any errors.

It is usually much quicker and more economical to make up one large wide board and then cut out what you need, rather than making up each individual width to suit. Mark the final arrangement with a large triangle to help you re-orientate it all later on.

The biscuit joints are cut with a router and cutter set Trend Ref. 342, which can be fitted with various bearings to suit the different sized biscuits.

Make sure you work from the face side on each board and then it doesn´t matter if the groove is perfectly centred or not. A dedicated biscuit jointing powertool cuts the groove to the precise length in one operation, whereas cutting them with a router like this requires you to mark each one.

The latter option is much quicker and to my mind it is actually better if the groove is slightly longer than necessary, as it allows you a little play when you line up the boards at the assembly stage.

Glue and cramp up the boards laying them out on spacers on the bench to help get everything flat and allow you to position the cramps more easily.

It is surprising just how much material is needed for even a relatively small project like this and I nearly ran out of cramps trying to get it all glued up on the first day.

Once it is all thoroughly dry, cut the boards to size, making sure that you don´t actually cut anywhere near a joint or you run the risk of exposing a biscuit. The worst of the glue squeeze-out can be chiselled away and then each board cleaned up with a belt sander. Take care with this though, as belt sanders are notoriously fierce and it is very easy to dig them in and cut grooves.

Alternatively use one that can be fitted with an external sanding frame that eliminates any chance of this, and cleans up these large surfaces effortlessly.

Matching components now need to be sized accurately and the best way to get the widths to match is to plane them up as one. I sandwich a strip of double sided tape between to stop them sliding around and then clamp them firmly in the vice at one end and with a G cramp at the other end.

The ends can be cut perfectly true using a straight cutter in the router, running the base against a straightedge.

The groove for the back panel is next, a simple job with a straight cutter in the router with a side fence, but remember that from now on the two sides of the carcass are "handed". The cross members are biscuited in place in the same way using the same slotting cutter to cut the ends of the shelves.

For the matching biscuit slots in the end panels, clamp them both together edge to edge, and then use a straight cutter in the router running it against a straight edge to produce the necessary groove.

As I wanted the shelves to be adjustable, this was an ideal chance to try out the Veritas drilling jig from Brimarc which allows you to cut two rows of evenly spaced holes with ease.

The shelf support sockets are pushed in using a special tool to prevent them being deformed and neatly flushes the head off with the surface.
Step 3 - Clamping up & Panel Door Construction
Next we can glue up the carcass and whilst waiting for the glue to dry we can begin to make raised panel doors with a router table.

The carcass can now be glued up, a very straightforward job provided you have cut everything accurately to length. But do check it for squareness at every stage as it is very easy to pull it out of alignment with a carelessly applied clamp.

Whilst this is setting up you can turn your attention to making the doors, which are a traditional raised panel construction. The groove for the panel is formed in each piece of the framework using a slotting cutter in the router table.

The same cutter can then be adjusted for height to produce the tenon on the end of each of the cross rails.

The router table is required again to shape the panels, this time using a panel raising bit such as Trend Ref. 18/83X1/2TC. Make sure you set the router speed to match the diameter of the cutter as many of these cutters require a much slower rpm, both for safety´s sake and also to minimize the risk of burning.

Take several passes to reach the required depth rather than trying to machine it in one cut, as this will leave a very poor finish, particularly on the end grain. A very light final skimming cut should leave a relatively clean surface with very little burning.

Before you finally assemble the door, run round the inside of the frame with a 45 degree chamfer cutter to take off the squareness. e.g. Trend Ref. 46/37 X 1/4TC or C049 X 1/4TC.

The door is assembled by gluing up only the framework, leaving the panel to float free within it. This arrangement allows the panel to move with any change in humidity, particularly important in a bathroom environment. Any attempt to secure it firmly within the frame will inevitably lead to it cracking somewhere.

Once the main carcass joints have set, glue in the central divider for the doors and the drawers. In retrospect, this might have been better biscuited in place at the assembly stage, but the strength of the glue is such these days that I am confident it will stay in place.

I decided early on to keep the ornamentation to minimum, so used the same chamfer cutter to run round the outside edge of the door frames.
Step 4 - Drawer Construction
Moving onto the two drawer boxes, created using a drawer lock joint cut.

The drawers are assembled using a drawer lock joint cut on the router table with a homemade jig, which is very quick and effective means of jointing. The only drawback is that the jig does require that the drawer side material is produced to accurate thickness.

The same jig is used to produce both halves of the joint which interlock firmly, but the ends have to be slightly thicker than the sides.

Machine a groove in all the drawer components to take the bottom. I use melamine faced hardboard for a clean, wipeable surface.
Step 5 - Plinth Shaping and Assembly
Next we can cut, shape and attach the plinth to the cupboard carcass

The plinth is next and this is just moulded and planted on around the face of the cabinet. Cut the mitres first, trimming them to be perfect fit and then mark and cut the length of each of the side pieces.

The front plinth is shaped to match that of the previously made corner cupboard, cleaning up the curved detail with a bobbin sander.

Fixing this plinth was something of work of art, as the sides had slightly bowed and warped, preventing the mitres pulling up properly. However the judicious use of plenty of cramps soon had it all straightened out. Keep checking as you tighten up as small pieces can sometimes "creep" gradually if the cramps are not on quite straight.
Step 6 - Drawer Fronts and Hinges
Next we focus on the drawer fronts and door hinges.

The drawer fronts just plant onto the previously made drawer boxes and this stage I decided to go for a little more ornamentation using an ogee style cutter to mould the edges. e.g. Trend Ref. 46/250 X 1/4Tc or C090 X 1/4TC.

Screw the doors in place positioning them initially with just a single screw to allow for any changes later if the alignment is not just quite right.

The drawer fronts can also be glued and fixed in place on the drawer boxes holding them temporally with a screw through the centre. This can be removed later when the glue has set and the hole used to locate the knob.
Step 7 - Making the Corian® Top Surface & Final Assembly
The carcass is completed by sliding in the back, in this case a piece of MDF, and then just pin it in place to each of the shelves.

Solid timber is rarely successful for this unless you are prepared to put in constant work keeping it sealed and waterproof. An alternative is to use a standard laminate covered work top or Corian.

Corian it generally available only in thin sheets, so the edges have to made thicker by laminating up several layers. It saws and routs relatively cleanly, though is very abrasive and quickly dulls sharp edges.
If you superglue the layers and use plenty of cramps the joint line becomes invisible, and the decorative edge can be routed in the normal way.

Use a staff bead cutter in the router table, making several passes to achieve the correct depth.

The only snag with routing Corian is that it is an extremely messy process and everything becomes covered with a fine layer of swarf that closely resembles snow, and this is even using the dust extractor!
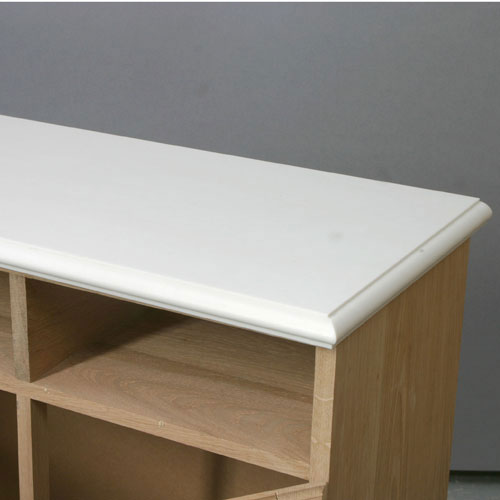
The top is glued in place using one on the mastic types of adhesive, but as this will add greatly to the weight you might want to wait until the cupboard is in position and stick the top on as the final operation.

The internal shelves are to melamine covered boards that will wipe easily.

The completed Bathroom Cupboard Routing Project.
Related Products
Related Videos
Bearing Guided Cutters
CDJ300 Dovetail Jig
Related Downloads
Related Test Reviews
Related Instructions

Document Download
Document Download
Document Download
Document Download
Document Download
Document Download
Related Files
Document Download
Document Download
Document Download
Document Download
Document Download