Pizza Cutting Board Routing Project
A unique pizza cutting board, grooved into eight equal portions.

I am becoming more and more interested in the use of recycled timber and a recent walk round our local industrial estate yielded quite a rich harvest of very usable material. Many of the businesses receive goods in packing crates made from a variety of timber species native to the country of origin.
As well as all the 'green' aspects of recycling, such material is often free for the taking away, a major consideration with the current high cost of new timber.
Step 1 - Preparing the Timber
The boards of wood need to be selected and then prepared to make the cutting board.

The boards had been used to bolts down some machine components, but there were some very handy lengths of undamaged timber between the various bolt holes.

For this pizza board, I needed to join up two pieces to get the required width, and although I usually make these joints on the machine planer there is some satisfaction in shooting them by hand. The finished size of this board is 12" x 16" to take a 10" pizza.

To maintain the alignment during the gluing up process it is better to slot in a couple of biscuits, so mark the position of this across the joint, keeping the biscuits well in from the ends.
Step 2 - Joining the Boards
Now, the biscuit slots need to be formed and then fitted together.

If you don´t have a dedicated biscuit jointing machine, the biscuit slots can be made using a dedicated router cutter which is supplied with three different diameter bearings to accommodate the various sizes of biscuit, Number 10's were used here.
I set the position of the biscuits slots by eye to be somewhere near the middle of the board, although the exact position is not critical provided you work from the face side on both pieces.

Check that the boards fit together properly with the biscuits in place and that there is no ragging at the exit end of the slots that will prevent the joint pulling up tight.

Glue and clamp up using a couple of sash cramps, across the joint keeping the clamp bars well clear of the glue to prevent them leaving a rusty mark on the work.

Apply another clamp from the other face to minimize the risk of bowing the piece under pressure.

When the glue in dry, clean up the edges to remove any clamp marks, trim the ends square and sand the top surface using a random orbit sander, working down the grades of abrasive to about 240 grit.
Step 3 - Routing Application
The grooves for the pizza slices now need to be formed.

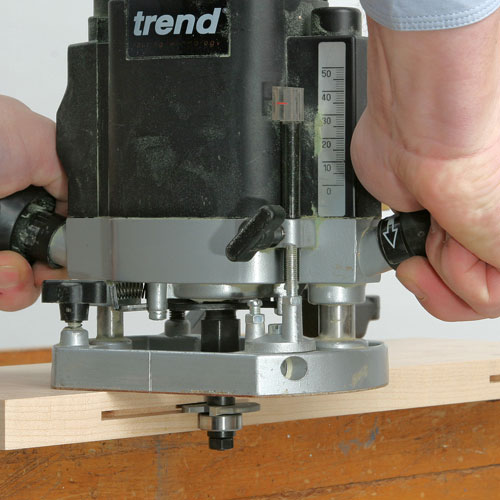
To form the pizza pattern grooves you need a router with a 45 degree V bit and a trammel of some sort.

Mark the dead centre of the board by drawing diagonals from corner to corner and use a bradawl two make a small hole at the intersection.

Fit the trammel to the router, make sure the trammel point is well seated into the marked centre and adjust to the required diameter by sliding the router out along the bar.

Set the depth stop and then plunge the router in, swinging it forwards as you do so to minimize the risk of burning at the entry point. Work anticlockwise to make sure the cutter pulls outwards against the trammel as you work and the circle ends up true.

Although it is difficult, try and maintain a smooth continuous movement without any stops as you swing the router round, as even the slightest hesitation will leave a burn mark that is very difficult to remove later.

With the circle scribed out, mark all the other divisions using a square for the two at right angles to the side and then dividing the remaining quarters in half with a rule.

To cut these dividers I used a straightedge as a guide for the router, temporarily sticking it to the board with double-sided tape 55mm away from each line, as I know this is the distance between the tip of the router cutter and the edge of the router base.

Work carefully as you make each cut to ensure sure you don´t cut the line through into the outer circle, but work quickly enough to minimize burning.

Provided you have used a sharp router bit, the cuts should all be clean with little feathering and require very little in the way of cleaning up later.

To complete the top surface I ran a small chamfer around the edge using a bearing guided cutter.
Step 4 - Finishing Touches and Presentation
Some final finishing touches to the board need to be done to complete the project.

To make it easier to pick up the board when it is loaded with a pizza, cut a couple of finger grips on the underside at either end using a bearing guided radius cutter.

Give the whole board a thorough sanding with fine abrasive and then apply a suitable finish. My preference is for a dedicated food safe finish that is oil-based and dries within about half an hour.

Two or three coats provides an impervious surface that is resistant to wiping, but still maintains a slight sheen.
That´s all there is to this simple pizza board, you just require a wheeled cutter and you´re ready for supper!
The completed Pizza Cutting Board Routing Project.